
When you are developing an application interfacing Google Driver API, it's mandatory to consider how you are going to handle the authentication for your user. In this article, we are discussing how to implement Google Drive Authentication for your app via its API.
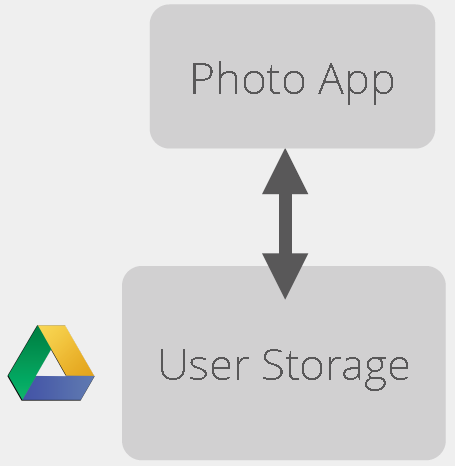
Storing Pictures
We’re building an application where users can upload, share, and save pictures. We want to store all our user’s pictures on their personal Drive account.
Using the Drive API, we can:
- Programmatically upload and download files
- Store application data
- Manage permissions
- Receive push notifications
- And much more ..
Getting Started
Here are the steps we need to get our app up and running. The steps below will be explained further, but the overview goes as below.
On Google’s website...
- Create a New API Project
- Enable the Drive API
- Register a New Application
- Customize the Consent Screen
In our application...
- Install the Google Client Library
- Create a Client Object
- Get Authorization from the User
- Make API calls to the User’s Drive
We Need to Tell Google About Our App
We need a client ID so communication can happen between our app and each user’s Drive account.
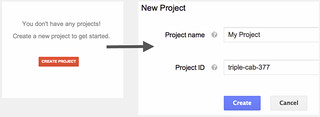
Creating a New API Project
In the Google Developers Console"Google Developers Console, create a new API Project.
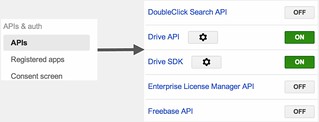
Enabling the Drive API & SDK
In the sidebar, goto APIs & auth > APIs then enable the Drive API and Drive SDK.
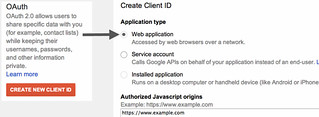
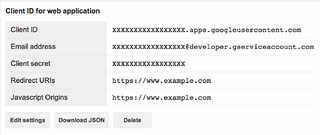
Creating a New OAuth Client ID
Goto APIs & auth > Credentials then click CREATE NEW CLIENT ID.
Specifying a Redirect URI
Below the OAuth 2.0 credentials, we can specify a Redirect URI. This is the page in our application that Google will redirect users to after they authenticate.
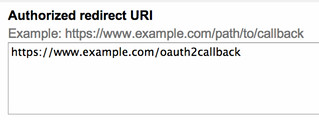
The page will now show our newly created Client ID!
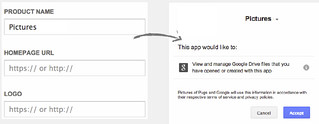
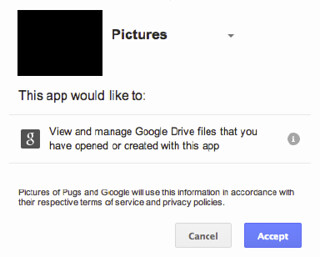
Customizing the Consent Screen
On APIs & auth > Consent screen, we can customize the information and logo on the consent screen the user sees when prompted to authorize our application.
Installing the Ruby Client Library
Manually install in the gem:
gem install google-api-client```

Or, if using Bundler, add to your Gemfile:

```sh
gem 'google-api-client'
Then, require it in your application:
require 'google/api_client'
Creating a Client Object
With the initial setup done, we can create a client object:
require 'google/api_client'
client = Google::APIClient.new
this is what we’ll be making our API calls on.
Setting Client Credentials
In your application, set the Client ID, Client Secret, and Redirect URI on the client we created earlier.
require 'google/api_client'

client = Google::APIClient.new
client.authorization.client_id = CLIENT_ID
client.authorization.client_secret = CLIENT_SECRET
client.authorization.redirect_uri = REDIRECT_URI
set these to the values shown in the Console
What do we want access to?
We are about to request access to a user’s Drive account, but we need to specify what we want access to do?
- Create, edit, and delete files that your application has created
- Read only access
- Full access to all files
- A few others
Authorization scopes are used to request different levels of access to a user’s Drive.
| **Scope** | **Meaning** |
| https://www.googleapis.com/auth/drive.file | Per-file access to files uploaded through the API |
| https://www.googleapis.com/auth/drive | Per-file access to files uploaded through the API |
| https://www.googleapis.com/auth/drive.readonly | Read-only access to file metadata and file content |
Use only if necessary — request the minimum level of access your app needs
Specifying a Scope
We want to be able to read and modify files uploaded by our application, so we’ll use the drive.file scope.
require 'google/api_client'
client = Google::APIClient.new
client.authorization.client_id = CLIENT_ID
client.authorization.client_secret = CLIENT_SECRET
client.authorization.redirect_uri = REDIRECT_URI
client.authorization.scope = 'https://www.googleapis.com/auth/drive.file'
Multiple Scopes
You can also set multiple scopes. Just make sure you request them all upfront, or else we’ll have to authenticate again.
client.authorization.scope = [
    'https://www.googleapis.com/auth/drive.file',
    'https://www.googleapis.com/auth/drive.appdata'
]
Prompting the User
Send the user to client.authorization.authorization_uri in their browser.
redirect_to client.authorization.authorization_uri
Obtaining an Authorization Code
If the user accepts the authorization prompt, they’ll be sent back to our site at the Redirect URI we set earlier with an authorization code. Set that code on our client object.
# https://example.com/code?state=/profile&code=4/P5qf21TgYWE15-15fWE62
client.code = params[:code] if params[:code]
Fetching an Access Token
The fetch_access_token! method populates our client object with the access_token, which is what grants us access to the user’s Drive.
client.code = params[:code] if params[:code]
client.fetch_access_token!
We are now authorized! It also sets the refresh_token (plus expires_in and issued_at), which we can use later to request a new access_token when it expires.
An Easier Way
Libraries are available that simplify authorization, such as the omniauth-google-oauth2 gem by Josh Ellithorpe.
Loading API Definitions
We need to load the Drive API definitions to call Drive API methods.
drive = client.discovered_api('drive', 'v2')
This drive object we’ve created contains all the methods we can use with the Drive API (e.g. drive.files.insert).