
Having a favicon for your site helps users to find your web site on a bookmarks bar, or among open tabs. Favicons are small, but a great way of promoting your brand on your website. You can create favicons yourself by making ICO files in Photoshop.
You can create favicons yourself by making ICO files in Photoshop. So let's look at how we can create favicons with Photoshop.
What is a Favicon?
Short for favorite icon, a favicon is a small, usually 16×16 px size logo which you can use on your website. If a browser supports it, it will display the favicon in the places like the address bar, the bookmarks bar, tabs, page history, browsing data, etc.
Favicons are saved as ICO files, a file format that saves multiple images at different sizes for scaling purposes. All icons in Windows, from desktop executables to Start Menu applications, are saved as .ico file extensions.
Creating ICO Files in Photoshop
Photoshop is a great and flexible graphics editing program for creating custom favicons. However, in order to save files under the .ico file extension in Photoshop, you have to download a separate plug-in. Luckily, this is really easy to do.
Step 1 – Install the plug-in
You can find the plug-in at a website called Telegraphics. You’re looking for the download labeled ICOFormat, which is available for both Mac and Windows. To install the plug-in, first make sure Photoshop is closed. Extract the downloaded files and place them in the Plug-Ins > File Formats sub-folder in your designated Adobe Photoshop location.
Now when you open Photoshop, create a new document, click Save As, and expand the drop-down menu, the ICO file type should be an option.
Step 2 – Create your favicon in a 64×64 document
If you’re a total pro and able to work within the confines of 16×16 pixels, by all means, go for it! But if you need a little more space to work with, you can start out with a document that is 64×64 pixels, and then scale it down later.

For our example favicon, we’ve created a simple gradient background and a single letter A to represent our brand.
Step 3 – Scale it down to 16×16
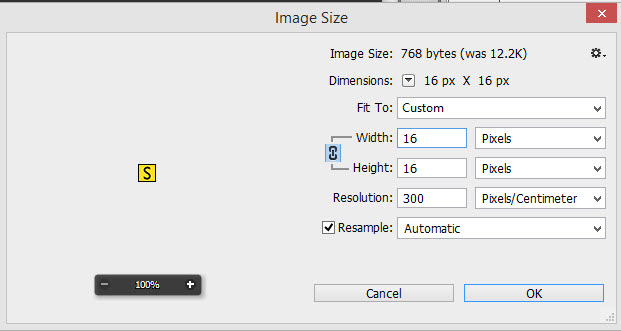
Now it’s time to resize the favicon so it’s compatible with web browsers. Go to Image > Image Size in the menu at the top, or press Alt+Ctrl+I, and change the size to 16×16. Make sure that’s pixels, and not inches. It’s also good to open up the drop-down menu where it says Resample and select the Bicubic Sharper option. This ensures the image doesn’t blur too much when it’s resized, but if it still loses too much sharpness, you can always adjust those properties with the Filter options. If done correctly, you should see your 64×64 icon transformed into a 16×16 favicon! Rounding the corners of your favicon can give it a whole new look. Depending on what kind of style you’re going for, it might be worth learning how to do.
Step 4 – Save your favicon as an ICO, or .ico file type

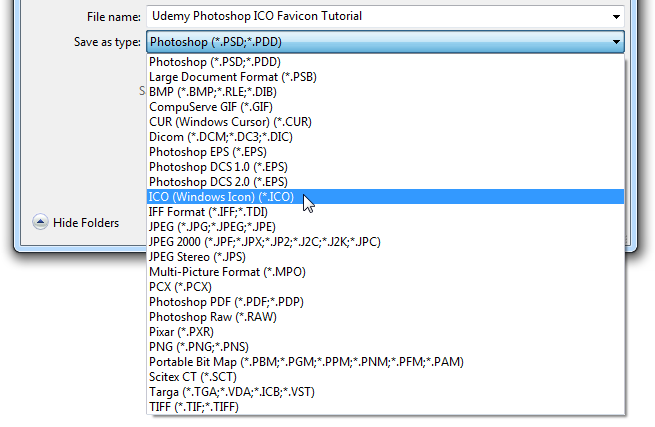
This step is simple. If you installed the plug-in correctly, now it’s time to go up to File > Save As, open up the drop-down menu and select the ICO (Windows Icon) (*.ICO) option. Hit the Save button, and you should be prompted about the icon format.

It’s recommended you save your file as a Standard ICO, since the PNG (Vista) format is not very compatible. After hitting OK, you might feel confused. Why does the Photoshop application still refer to our favicon as a .psd, when we just saved it as an ICO? That’s because an ICO file is not editable in Photoshop. Just try to open it up, and see. Once you save your favicon as an ICO, that ICO file is final. If you want to make changes to it, you’ll have to continue editing the .psd file until you’re satisfied with the final product, and save it as an ICO again.
Using Your ICO File on Your Website
So you have your beautiful new favicon saved as an ICO file, but how do you actually make it show up in bookmark bars and tabs for your website?
This first rule is important to know: your ICO file should be saved (or moved to) the directory where your home page is located, usually the root folder. If you save it in a separate image directory or elsewhere, the browser will not be able to find it.
Next, make sure you have the following inserted between the <head> tag in the HTML document for your home page:
<head>
    <link rel="icon" href="FaviconNameHere.ico">;
</head>
FaviconNameHere should be substituted with the name of your .ico favicon file. By default, browsers will search for favicon.ico so it’s best to save it as such.